What is multi-factor authentication/MFA? Why MFA can improve the safety of password management database?

As the data breaches on internet become a serious problem of personal safety of internet users, the old way of authentication using only username and password is vulnerable to the attack. Major network service providers start to use multi-factor authentication to improve the safety of their users.
Multi-factor authentication
Multi-factor authentication or MFA is a method of confirming a user’s claimed identity in which a computer user is granted access only after successfully presenting two or more pieces of evidence (or factors) to an authentication mechanism. The evidences could be knowledge (something the user and only the user knows, such as password), possession (something the user and only the user has, such as smartcard), or inherence (something the user and only the user is, such as fingerprint).
The popular multi-factor authentication methods used by the banks are:
- Username/password together with a smartcard/USB token
- Username/password together with a hardware OTP token
As mainly two factors for the authentication are used, it is also called two-factor authentication or 2FA. With the prevalence of OTP based authentication, the authentication methods such as software OTP generator, SMS based OTP or app pushing notification are also used by many service providers.
Multi-factor authentication in KeePass
KeePass is a famous open source password management tool. It is especially popular in the community of programmers. The built-in MFA support in KeePass looks simple, but KeePass actually provides the richest support of MFA. Many MFA features of KeePass are provided through KeePass plugins which are developed by various open source developers. The MFA support in KeePass can be divided into the following two categories:
1. Multi-factor authentication to access KeePass database, and
2. Using KeePass to store multi-factor authentication data
In this article, let’s focus on the first category of MFA support. The second category will be discussed separately in another article shortly.
The framework in KeePass to support MFA is through Composite Keys and Key Providers. This is a very flexible framework which allows open source developers to contribute to the KeePass MFA development easily. As such, PassXYZ implements its own Key Provider which can be used together with master password to form Composite Keys to encrypt the database.
Besides the new Key Provider developed for PassXYZ, PassXYZ also provides an easy-to-use user interface so that all users can use this feature without any difficulties.
How to use MFA to improve the safety of PassXYZ database
The Key Provider in PassXYZ is implemented as Device Lock. What is Device Lock? If you used mobile banking app before, you might know that you have to bind the app with your device before you can start to use it. The Device Lock in PassXYZ uses a similar concept to improve the safety of PassXYZ database. When a user wants to create a new database, there is an option to enable Device Lock. If the user enables the Device Lock, the database is bound to the current device. Therefore, even if the hacker obtains the database and tries to break it through brute force, they would find that they won’t be able to do it due to the Device Lock. The possibility to break an encrypted data through brute force depends on the level of encryption. Device Lock is a very strong encryption method comparing to master password. When PassXYZ users use Composite Keys with both Device Lock and master password, there is no chance for a hacker to break the database through brute force. This feature is especially important for the users who choose to store their database on the cloud.
How to enable Device Lock
When the users create a new database, they can enable Device Lock through a switch as shown below at the bottom of SignUp page.
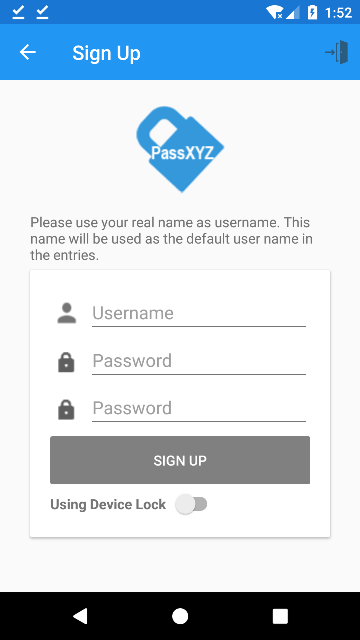
After turn on this switch, the new database is created with Device Lock enabled.
How to use Device Lock enabled database on another device
If the users create a database with Device Lock enabled and want to transfer it to another device thereafter, they won’t be able to access this database in the new device due to the Device Lock. If the users do want to use Device Lock enabled database on multiple devices, they can actually follow the steps below:
1. Transfer the database to another device first
2. Find the Device Lock Key on the current device
3. Scan the QR code of Device Lock Key through the new device
In step 1, there are multiple ways to transfer the database to another device. With PassXYZ Cloud, the transfer is very easy. Users just need to turn on the synchronization of the database on the new device. Other than synchronization through the cloud, users can also export the database through the Sharing function of the system. In the Settings menu, there is an option Export database. By clicking this option, a sharing dialog will be displayed by the system. The users can choose Bluetooth, email or other methods provided by the system to transfer the database to another device. After importing the database, the users will be able to see the login screen as below:
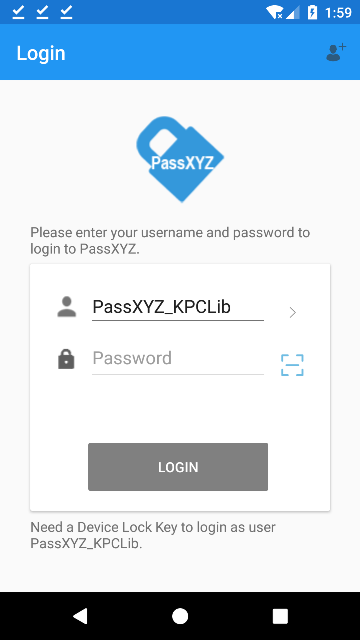
As you can see, the password field is disabled temporarily in the above login screen. The users therefore cannot just login using master password. A hint is displayed at the bottom of the page which tells the users that a Device Lock Key is needed to access this database. Now the users can click the scanning button beside the password field to scan the Device Lock Key QR code on the original device.
The QR code of Device Lock Key can be found in the Settings of the original device. In the Settings page, there is a Security Settings option as shown in the below screenshot.
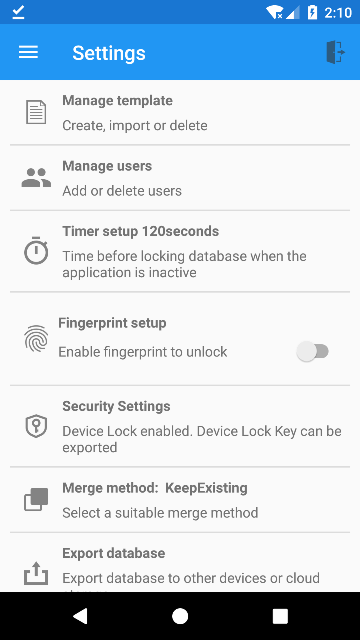
After selecting the Security Settings option, a popup window with two options will be displayed as below.
- Device Lock Key QR code
- Export Device Lock Key to a file
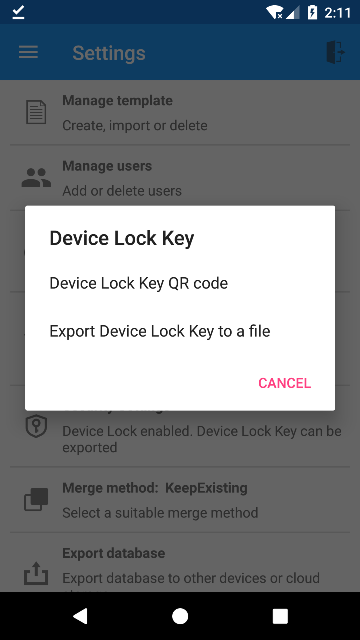
The users can choose either of the ways to transfer the Device Lock Key to the new device. After the Device Lock Key is imported on the new device, the users can login as usual.
How to enable Device Lock for the existing database
For the safety reason, the users may want to enable Device Lock for their existing database. This can be done through the following steps:
1. Go to Settings and select Security Settings
2. In the popup windows, provide a new username for creating the new database, and click Import
If the Device Lock is disabled, the users can find the Security Settings as shown in the screenshot below.
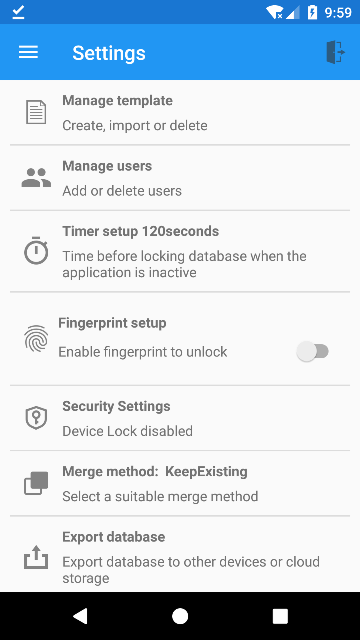
To convert the current database to a new one with the Device Lock enabled, the users can click the Security Settings. The following page for the data converting will be then displayed.
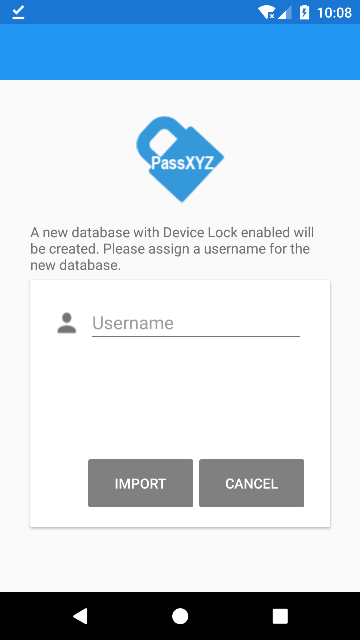
In this page, the users need to give the new database a name and click the Import button thereafter to create the new database with Device Lock enabled. After confirming that everything is ok in the new database, the users may choose to delete the old one.
Security Analysis of PassXYZ Device Lock
As above, we have explained what the Device Lock is and how we can use it. Now, let’s do some analysis about the security of Device Lock. It will be hard for most of the readers to understand if we are to analyze the security of an encryption function directly. To make it simple, we can compare Device Lock with the similar implementation in 1Password. Secret Key in 1Password is a very similar feature comparing to Device Lock in PassXYZ. There is an article which introduces what Secret Key is and how it works. Below is a diagram from that article which tells us about Password Entropy and the quality of password.
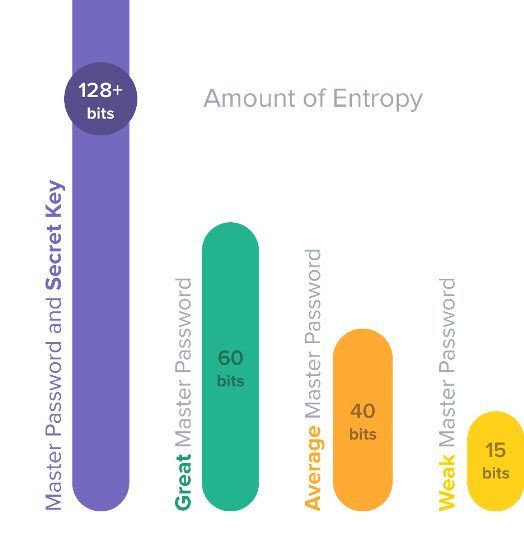
From the above diagram, we can see that with the combination of master password and Device Lock (or Secret Key), we can achieve more than 128bits of entropy. The Master Password that people can memorize, on average, will only be strong as about 40 bits of entropy. Device Lock or Secret Key doesn’t need to be memorized, so it can be much stronger. With 128 bits of entropy, it is infeasible to guess no matter how much money or computing power an attacker has.
Usually, an attacker tries to guess the password through enumerating all the possible combination of available characters. How long time will each guess take is a key factor to the success of an attack. In the design of encryption, we usually use a Key Derivation algorithm to achieve this. In 1Password, the algorithm PBKDF2 is used. In KeePass, there are many algorithms can be used, such as AES-KDF or Argon2 etc. Since Argon2 is the winner of Password Hashing Competition, it is the default Key Derivation algorithm used by KeePass. Based on the introduction of Key Derivation algorithm, let’s look at another diagram from 1Password concerning Key Derivation algorithm and password entropy.
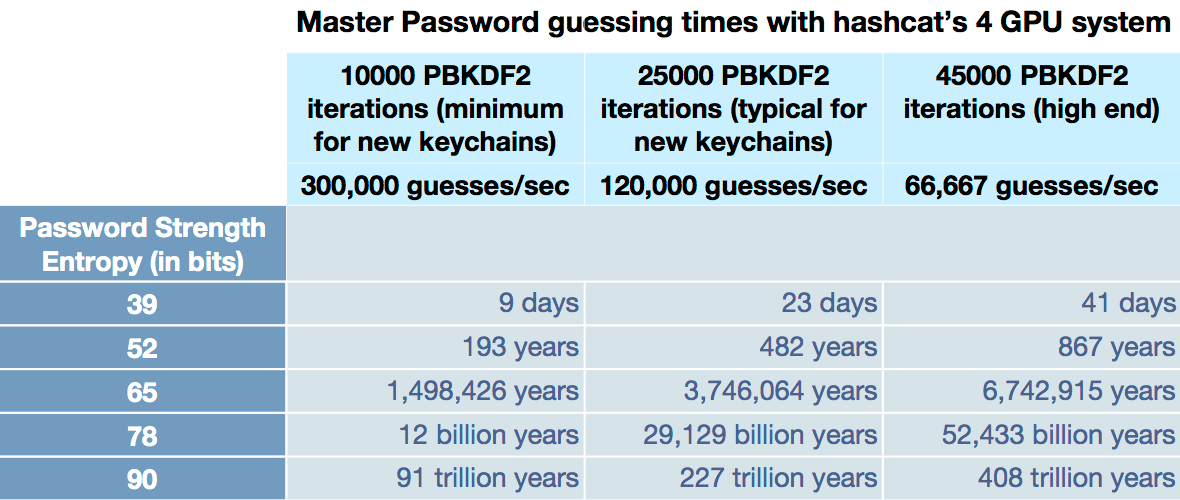
As we can see from the above diagram, given the complexity of Key Derivation algorithm and password entropy, we can estimate the amount of time to discover the master password under a particular hardware configuration. For the average password strength with about 40 bits entropy, it takes about 2 weeks to 2 months to discover the master password. But, when the password entropy goes above 65 bits, the amount of time needed to discover the master password will be a very large number which is almost impossible for an attacker to complete.
Summary
For the safety of PassXYZ database, it is suggested to enable Device Lock for all new databases. To backup the Device Lock Key, the users may wish to print a hard copy of the QR code and keep it in a safe place. For the users who want to store their database on the cloud so as to take the advantage of synchronization and backup, Device Lock can keep their database much safer. Without Device Lock enabled, the database may be vulnerable under the brute force attack.
PassXYZ is a cross platform password management software developed using KeePass. PassXYZ can run on Android, iOS and Windows 10.
If you are interested in the personal information management, please add PassXYZ Wechat public account by searching the keyword PassXYZ or link it using Wechat name passxyz_kpclib. The source code of KPCLib can be found at GitHub at https://github.com/passxyz/KPCLib.
You can also find more information about PassXYZ on its website and install it from Google Play, Apple Store and Microsoft Store.